Apps in the Curriculum (all levels)
|
|
~Creating / Showcasing Knowledge~
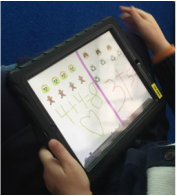
Explain Everything
Explain Everything is one of the most versatile apps for reaching into the minds of your students. With the toolset of EE, students of all ages can create multimedia (text, drawing, video, images, annotation, audio, links) slides to share their thoughts and explain their learning. EE is also a great resource for flipping your classroom with teacher (and student) made tutorial tutorials.
~click on the image below for the full handout~

*Demonstration Videos
Students can create videos that record their actions & voice while they demonstrate understanding of a math concept (ex. 21x2=).
Teachers record videos demonstrating how to work through math skills & post online.
*Fluency/Student Reading Record
Capture a piece of writing or pages of a book & have students record themselves reading it.
*Student Projects
Student can capture images or drawing of their work and use the app to record audio & annotations as they explain their thought process.
*Topic Presentations
Students can create an audiobook or presentation about a person or topic they are learning about (text, audio, annotation, video...).
*Work Reflection
Students can capture images of their writing throughout the year & reflect on how they’ve grown.
|
|
|
|
Green Screen by Do Ink
Do Ink's Green screen app creates the ability to transport yourself anywhere.
Students utilize the Green Screen app, and a green screen setup
(can be green felt tacked to a wall or the whole official setup)
to create video products showcasing their learning.
~click on the image below for the full handout~
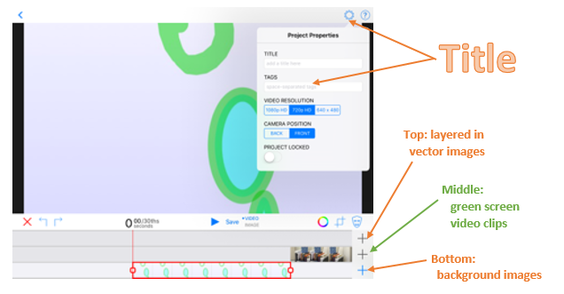
1. Storymap your video (images & dialogue)
2. Find & save background images (and background video if needed)
3. Find & save vector images to layer into top layer (if needed)
4. Record video with Green Screen background (works better from Camera app)
5. Compile Video, background, and top layer images in Green screen app
6. Save Video
*can be imported into iMovie for further polishing (title/credit slides, background music/sound effects)
|
|
|
Pic Collage / Pic Collage for Kids (no ads or YouTube)
Pic Collage creates an easy way to present knowledge in a poster format.
Pic Collage creates an easy way to present knowledge in a poster format.

|
*Create presentations with images (from Camera roll or web), Youtube videos, text, and stickers.*
1. Click the "+" to add items to your collage 2. Use pinch and drag to resize, move, or delete items 3. Share to "Library" (camera roll) |

|
Comic Life
Comic Life can be used to create comics, how to guides, newsletters, field trip reflection pages for class websites, storyboards, trading cards or just about anything that involves arranging images and text into a nice poster layout.
Comic Life can be used to create comics, how to guides, newsletters, field trip reflection pages for class websites, storyboards, trading cards or just about anything that involves arranging images and text into a nice poster layout.
1. Choose a template or choose to start with a blank page.
*Click the page icon (rectangle in top right) to add pages, change the template, or choose a layout.
*If you do not use a layout or template, drag the rectangle frames from the bottom of the window to add "frames" for images or boxes for your layout.
2. Click the "+" icon to add images, arrows, comic word bubbles, or search for online pictures.
3. Drag text boxes, bubble lettering, or speech bubbles onto your page.
4. Use the paintbrush tool to edit/add style.
*single tap an item to edit the outside area (ex. picture frame, text box or speech bubble frame)
*double tap an item to edit the inside are (ex. picture inside of a frame, text inside a box or bubble)

|

|

|
Interview Example from: QZAB teachers
|
Book Creator
Book creator brings out the author in any child. With this app, students & teachers can easily create & publish ebooks, pdfs, and comics.*
Book creator brings out the author in any child. With this app, students & teachers can easily create & publish ebooks, pdfs, and comics.*
1. Click New Book
2. Choose the orientation you want.
(if books will be combined, make sure to choose the same layout)
3. Use the + sign to add photos, drawings, and text
(text can be copied and pasted from another file if students have a rough draft started)
(keep text, titles, heading, in seperate boxes - eac box can only have one style,background,etc.)
4. Use the "i" button to edit style and layout options
5. Use the + sign to add audio recordings (play buttons) throughout the book
6. When your book is complete, make sure to name it & add author(s)
*"My Books" start menu > "i' icon
7. Use the share arrow icon to share your book
(Export as ePub, Export as PDF, Export as Video)
*Students can create book chapters on their own iPads and share the chapter ePub to a master iPad (vid Google Drive) for compilation in a group or class book.
|
|
|
ChatterPix / ChatterPix Kids (called Chatterkids)
ChatterPix creates a fun way to put a voice to almost anything. Teachers can create quick introductions to a lesson. Students can create clips modeling their understating of a topic or shortteaching/presenting clips.
ChatterPix creates a fun way to put a voice to almost anything. Teachers can create quick introductions to a lesson. Students can create clips modeling their understating of a topic or shortteaching/presenting clips.
|
|
*Draw a mouth on any picture & make it talk.*
1.Take a picture or open an image from your pictures (draw an picture in Doodle Buddy & save to camera roll, find a copyright free image & save to camera roll) 2. Draw a mouth on the image/picture 3. Record what you want the image/picture to say (30 second time limit) 4. Share to Photos |
|
|
|
|
|
|
|
Thinglink
Thinglink is an awesome platform for students or teachers to tag their thoughts/knowledge/learning about any topic to an image. Thinglink's interactive images create a visual framework full of "hotspots" that are easy for students to navigate as a presentation tool or utilize as a learning tool. Thinglink can also be utilized as a tool for creating engaging videos. Teachers or students can embed tags with google forms (questions), images, or links to create resources and learning checks throughout the videos. |
|
1. Upload an image or video that will serve as the base/background to tag
2. Add tags to the image or throughout the video *image tags can contain text, images, video, or links *tags can be customized by icon and color to make the information easy to navigate *video tags can include text, images, google form questions, etc. (learn more about Thinglink video) 3. Share the completed Thinglinks via your class channel, a link, an embed code, or through social networks. |
|
|
|
Popplet / Popplet Lite (free version)
Popplet is a wonderful tool for creating mind maps. Students can use Popplet to easily create bubble maps, flow charts, times lines, tree maps, or other mind maps.
Popplet is a wonderful tool for creating mind maps. Students can use Popplet to easily create bubble maps, flow charts, times lines, tree maps, or other mind maps.
|
1. Double tap on the screen to make a "bubble"
2. Add text, images, or drawings to the "bubble" 3.Click the white circle on the outside of the bubble to add an attached "bubble" *change "bubble" color, use arrows to resize, drag to arrange* 4. Name your Popplet and export it as a jpeg (saves to camera roll) |
AirSketch / Air Sketch Free
Airsketch takes student dry erase boards to a whole new level.
With Airsketch, each iPad displays to a unique URL that can be displayed on the teachers laptop/projector.
~Free Version- white page with black pen.
~Paid version adds multiple colors,& pages, photo option, ability to open a pdf, and sharing options.~

|
*Write a problem on the iPad and pass it around for students to solve (work projects on your board).
*Have students work with partners to solve problems, spell site words, etc. --- Open multiple tabs on the computer with urls from each student/groups iPad (click between each to share student work/group work) or open multiple windows for each student/group iPad. *Give one student an iPad to work on math facts, writing high frequency words, etc. Have the web address for that iPad open in your browser so you can monitor their work while you work with another group/student. |

|

BaiBoard
Baiboard connects teachers and students to virtual whiteboard spaces (boards). Each board can be customized with multiple pieces of digital chart paper that teachers and students can write on, import pictures or PDFs to, and save from.
*Teachers & students can create their own BaiBoard rooms and share the room number for collaboration.
|
1. Tap the + to create a new board
*Grid can be turned off if you would like a blank white page 2. Set up your chart paper *Press the import icon (square with a paperclip) to pull in a pdf, images, a map *Use the text tool to type on the page or the pen/highlighter/shape tool to draw *Baiboard also provides "sticky notes" and icons for your pages 3. Press the menu button at the top right & choose "start meeting" 4. Share the room number with the students you would like to collaborate (can set a password if you would like) 5.Ask students to open the Baiboard app and click "join meeting" |
|
Paper by Fifity Three
*Sketch, Draw, Take Notes, Make Lists, Diagram and Wireframe 
|

~Displaying~
|
|

|
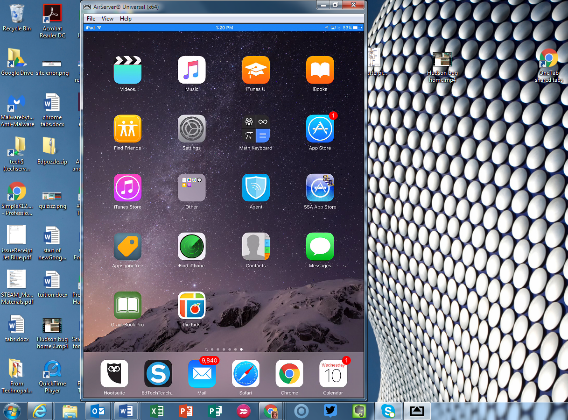
1. Open Air Server on your Computer
*if not set to open at startup 2. Swipe up from the bottom of your iPad 3. Click Airplay 4. Choose your computer from the list 5. Slide the "mirroring" toggle to on (green) 6. Close the control center menu & continue working on your iPad 7. Swipe the control center menu back up on the iPad to turn mirroring off. **To exit full screen view on your computer, click “ALT” & “ENTER” at the same time.** |
|
~Saving/Sharing~
~Saving/Sharing~
|
|
Google Drive
files can be shared to student iPads/Teacher iPads through a shared Google Drive account (ex. 5thgradestudents@yourschooldomain) or shared folders within drive teacher & student Google accounts ~ this works great for passing out files, collecting student work from the iPads, and for students to share collaborative projects
files can be shared to student iPads/Teacher iPads through a shared Google Drive account (ex. 5thgradestudents@yourschooldomain) or shared folders within drive teacher & student Google accounts ~ this works great for passing out files, collecting student work from the iPads, and for students to share collaborative projects
Google Classroom
create assignments in Google Classroom for students to open on the iPad
*Within an assignment you can attach a file for students to start with or they can create their own materials within any app and use the Google Classroom "TURN IN" feature to hand in the assignment
create assignments in Google Classroom for students to open on the iPad
*Within an assignment you can attach a file for students to start with or they can create their own materials within any app and use the Google Classroom "TURN IN" feature to hand in the assignment
Dropbox
set to automatically upload photo library or upload file as you create them
save files to a dropbox folder for stunt to open on the iPad
set to automatically upload photo library or upload file as you create them
save files to a dropbox folder for stunt to open on the iPad
